"Something locked on me that I can't interact with, that can control me but not inform me. That's very helpless feeling. Very controlled without my input or opinion."
Code Captivity is a command-based ownership system, a tool, a strict control medium between the owner and the sub that will execute commands as instructed.
When locked, ownership will be stored in an external database, so cheating is not possible.
Restrictions and folder locks use LinksetData (LSD) and will survive a script-reset.
Ownership and contracts will survive even item-redelivery since they are located externally.
A timed contract can be established between the owner and the sub, while the contract is active the sub cannot use their safeword, and the contract owner will always be able to unlock them even if they are locked by another.
While under contract, the system informs the sub for very few things, leaving them unaware to things they don't need to know.
While locked, only list, add, and remove commands are allowed for the sub.
If under contract, no commands are allowed.
*Owners can always auto-teleport or IM the sub.
The Prefix
The Prefix is designed to allow flexibility by letting users utilize any part of the wearer’s display name or account name as the prefix, making it easy to issue commands without typing full names. A prefix ensures that commands are directed only to the intended target, especially when multiple controlled avatars may be nearby.
The System listens to the channel 33.
Additionally, an ‘all’ prefix is available to authorized users, allowing them mass control over their subjects.
Example: '/33 all leash'
Ownership
The Authorized Avatar and Primary Authorized Avatar are key roles within the system, to ensure stability, this data is securely stored in an external database and is designed to remain tamper-proof, even if the wearer attemps a reset.
Authorized Avatar: The Authorized Avatar is the current controller, able to execute commands, lock and unlock the item, and change settings. This role can be transferred to someone else by using the “passto” command or if the object is unlocked and someone else locks it. The details of the Authorized Avatar, are securely saved in an external database, so control remains steady, even if the script resets.
Primary Authorized Avatar (Contract Status): When a contract is active, a Primary Authorized Avatar is assigned, being a Primary Authorized Avatar means that it will always be possible to unlock the wearer, or claim them back regardless of the conditions. While the Primary Authorized Avatar is set, the wearer is unable to use their safeword, so initiating a contract and gaining this status carries a certain responsibility with it too.
Failsafe for Database Unavailability: In case the database becomes temporarily unavailable, a local backup is maintained within the object memory. This local copy allows the item to function with the most recent settings until the external connection is restored.
Contracts
A contract is a time-bound commitment between the wearer and an Authorized Avatar, designating them to Primary Authorized Avatar and giving them power to unlock or claim the wearer from someone else no matter what. Once a contract is set, the wearer is unable to use their safeword anymore or change the Primary Authorized Avatar until the contract expires. The system uses an external database to securely store the contract details, making it impossible to bypass or reset until the contract naturally concludes.
The command to initiate a contract is ‘contract <duration>’, where duration specifies the contract duration in days. Example: /33 nim contract 5 — This command requests a 5-day contract between the wearer and the authorized avatar, making the avatar the primary owner for the specified duration.
The initial contract duration is capped at 7 days. If a longer duration is entered, it's automatically reduced to the maximum. The 'addtime' command can be used later to extend the contract.
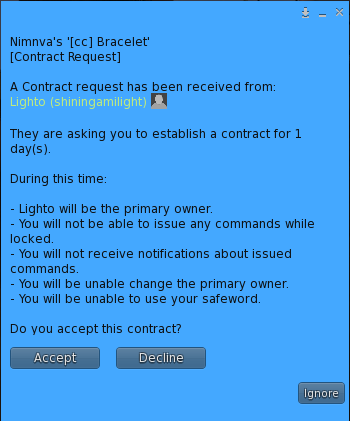
Once the contract command is issued, the system sends a confirmation dialog to the wearer, providing detailed information about the contract.
The wearer is presented with two options:
Accept or Decline.
If the wearer accepts, the Primary Authorized Avatar is officially set, and the contract end time is calculated based on the specified duration. Both the Primary Authorized Avatar and contract end time are then securely stored in the database, making them persistent across sessions and preventing any bypass.
The wearer receives a message confirming the contract’s start, along with the duration of days it will remain in effect.
- contract <number of days (max 7)> : Initiates a contract request.
- addtime <number of days> : Increases contract time duration.
Transfer Contract
The 'transfercontract' command allows the Primary Authorized Avatar to transfer the active contract to another avatar, effectively handing over the power associated with the contract. This command is only available when a contract is currently active and can only be initiated by the Primary Authorized Avatar.
- transfercontract <UUID>: Transfers the current active contract.
Extend Contract
The 'addtime'command is designed to extend the duration of an active contract between the property and the primary owner.
- addtime <number of days>: adds time to an already active contract.
Group Ownership
The Group Ownership system allows members that wear the same active tag as the avatar to claim control over them, provided that group mode is enabled. This setup is ideal for situations where multiple users, such as a group of trusted individuals, need shared access to control the wearer.
The ‘groupmode on’ command enables group mode, allowing group members with the same active group tag as the wearer to claim control using the claim command. When group mode is activated, a message is sent to nearby chat, confirming that group members can now claim control. To disable group mode, use the ‘groupmode off’ command.
When group mode is active, any member using the same tag can type ‘claim’ to take control. Once a group member successfully claims control, the item is set to a locked group state, preventing the wearer from changing their active tag. When claimed, notifications inform the wearer, the authorized avatar, and the previous authorized avatar if any present, notifying them of the new control status.
The ‘passto’ command enables the owner to pass control to another avatar. When the passto command is issued, the system searches for avatars within range, attempting to match the provided name or partial name with nearby avatars. Example : ‘passto John’ Transfers control to an avatar with a name that matches “John” within range.
If a contract is active and a Primary Owner is set, the Primary Owner can always claim the avatar back by issuing the claim command, regardless of which group tag is active or if groupmode is on or off.
- groupmode on: Enables group mode.

- groupmode off: Disables group mode. (default)

- claim: Claims control of the current avatar if the same group tag is active.

- passto <partial name>: Transfers control to a specified avatar by name or partial name.

- deny setgroup: Locks the active group.
- allow setgroup: Unlocks the active group.

- setgroup <name or uuid>: Sets the active group.
Command Queueing
The Command Queueing system enables authorized users to chain multiple commands, allowing them to set up complex sequences that execute seamlessly in order. Authorized users can issue a series of commands, one after another, and each command will be added to the queue to be processed in the exact order it was given.
Even upon relog, the queue will simply continue from where it left off.
The + and ++ commands are powerful features within the command queueing system that allow authorized users to manage and modify command sequences.
+ : Combines items within one command. Example: /33 gerka add gags + cuffs will add both the “gags” folder and the “cuffs” folder. ++ : Chains separate commands. Example: /33 gerka add gags + cuffs ++ list will first add the “gags” and “cuffs” folders and then move on to execute the list command.
The commands ‘cancelq’, ‘wait’, ‘stopwait’, provide control over the command queue and timing in the system, allowing the user or authorized avatars to introduce pauses, or resume processing commands when needed.
The ‘cancelq’ command clears all pending commands from the command queue, effectively stopping any actions that have not yet started. The ‘wait’ command introduces a delay in command processing, pausing the script’s response to new commands for a set period. The ‘stopwait’ command immediately cancels any active wait period, resuming command processing. The ‘status’ command provides an overview of the avatar status, displaying a detailed list about the current settings, restrictions, owners, home location, and time left on an active contract. This command is essential for the wearer or authorized avatars to quickly understand the current status of the wearer.
- wait <duration seconds>: Sets a delay before the next action.

- stopwait: Cancels any active wait timer.

- cancelq: Cancels the command queue and any active wait timers.

- status: Displays current settings and restrictions.
Safeword
The Safeword is a critical feature designed to give the wearer an emergency way to escape, it can be used only if the wearer is not currently bound by an active contract.
When the safeword is used, the script immediately releases all active restrictions. This includes unlocking the item, removing any RLV restrictions, reseting the relay, turning group mode off, and clearing any active commands. The safeword also triggers the command queue to cancel all pending commands, stopping any ongoing or queued actions. Upon safeword activation, the wearer is notified that the item has been unlocked and restrictions are cleared. The system also notifies the previous Authorized Avatar (if applicable) that their access has been revoked and that they can no longer control the wearer. When the safeword is triggered, the previous Authorized Avatar is temporarily soft-banned from regaining control of the item until the wearer relogs. This prevents the same avatar from instantly reclaiming control after the safeword is used, providing the wearer with a safe buffer period.
Contract Compatibility: If a contract is active (binding the wearer to a Primary Authorized Avatar for a set duration), the safeword is restricted during the contract period. When a contract is active, the wearer cannot use the safeword to unlock until the contract expires. If the wearer attempts to use the safeword, the system will notify them of the remaining contract time, providing days, hours, and minutes left until the safeword becomes available again.
Safeword Usage: <prefix> safeword

Example: /33 nim safeword
Folders
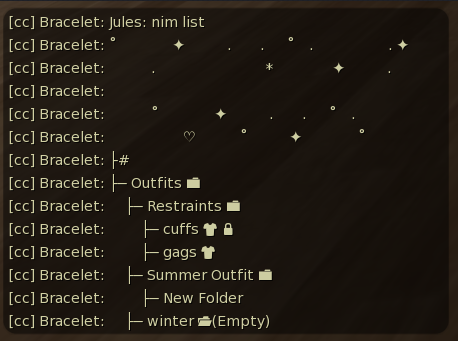
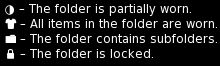
The Folders System explores the RLV folders and displays a detailed list with proper indentation, indicating how deep the folders are relatively to the root path, it displays information with icons next to each folder, showing which ones are empty, worn, partially worn, or locked.
The locked folder checking happens in real time instead of script memory by checking the RLV restrictions, so even if a folder is locked by another item the locked status will still be indicated properly.
When you add/remove/lock/list a folder, there is no need to type the whole path, typing an approximate name for what you’re searching will automatically find and trace the correct path.
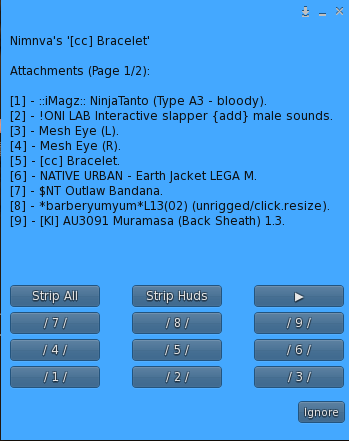
The ‘strip’ command will display a menu that can selectively strip any worn attachments whether they are part of the RLV folders or not, it can also strip HUDs.
-list: Recurses 2 levels deep from the root and displays a detailed list of the folders and their current statuses.

-list <partial name>: Finds the folder and its path, recurses 1 level deep, and shows its contents.

-add <partial name> : Attaches the folder.

-remove <partial name> : Detaches the folder.

-lock <partial name>: Locks the folder.

-unlock <partial name>: Unlocks the folder.

-clearlocks: Clears all active folder locks.

-strip: Displays strip menu.
Leash
The leashing system is designed to create a leash effect that keeps the avatar connected to a specific point or object, You can leash the avatar to another avatar or an object by providing a partial name, it will then find the closest object or avatar that matches the name and leash them on it. Inside the object there is a ‘LeashConfig’ notecard, by configuring the parameters within the notecard you can customize the leash effect to the same extent as if you were writing the particle function yourself. By default the leash particles are designed to create a realistic chain effect.
'leashto' even detects their leash holder, if leashed to an avatar.
'anchor' will leash to the closest object that is not avatar.
If target object or avatar dissapears, the sub is immediately anchored to the closest nearby object.
- leash: Starts a leash connection.

- leashto <partial name>: Leashes to a specific object or avatar.

- anchor: Leashes to the closest object.

- unleash: Releases the leash.

- length <value>: Sets the leash length.

- yank: Pulls the leashed avatar closer.
Sit and Stand
The sit command, scans a certain range (10 meters by default), and makes the avatar sit at the closest object, or at a specific object if you provide a target name even partially. For example, ‘sit bench’ will scan for objects that contain the word “bench” and make the avatar sit on the closest one it finds.
- sit: Commands the avatar to sit on the nearest object.

- sit <partial name>: Commands the avatar to sit on the nearest specified object.

- stand: Commands the avatar to stand up.


- deny sit: makes the wearer unable to right-click sit on objects.

- deny stand: greys out the stand button.
Teleportation
The tpto command is used to teleport the avatar to a specific location. By default, if only the region name is provided (e.g., tpto <region name>), the avatar will be teleported to the center of that region. To target specific areas within the region, you can include directional keywords such as north, south, east, or west, which will land the avatar in the corresponding part of the region. If precise coordinates are known, they can be specified directly to pinpoint an exact location. For instance, using tpto Sandbox:100,150,30 will teleport the avatar to the exact coordinates (100, 150, 30) within the “Sandbox” region. The command ‘tpto me’ will teleport the wearer to the authorized avatar and rotate to face toward them. If a home position is set the command ‘tpto home’ will instantly teleport the avatar home.
When the wearer logs in or changes regions, the owner will receive information about their location and the time and date they were seen.
- tpto <region name>: Teleports to the specified location.

Example:'tpto zantosa:random' will teleport the user to a random position in the sim zantosa (east, northeast, west, etc also works)

- tpto home: Teleports the avatar home.

- tpto me: Teleports to the key holder.

- sethome: Sets the current location as home.
Confinement
The ‘confine’ command restricts the avatar’s movement to a defined range from where they currently stand. By setting a confinement radius , the avatar is limited to moving only within this boundary, and the system will automatically teleport the avatar back if they attempt to leave it. By default, confinement mode uses a 5-meter radius, but you can specify a custom radius by adding a number after the command (e.g., confine 10). The command release disables confinement mode.
- confine <radius (optional)>: Restricts movement to a radius.

- release: Removes confinement.
Banned Regions
Banning a region helps manage where the avatar can go in Second Life. You can set up regions where the avatar is either allowed or banned. If the avatar enters a banned region, the system will automatically teleport them safely back to their home location. If you want to limit access to just a few regions, add those regions using simallow. If you have any allowed regions listed, the avatar can only travel to those places and nowhere else.
Use the command ‘sethome’ to mark the current location as “home.” This is where the avatar will teleport back to if they enter a banned region.
- simban <sim name>: Adds a region to the banned list

- simallow <sim name>: Adds a region to the allowed list

- sim list: Displays the current list of banned and allowed regions.

- sim clear: Clears all banned and allowed regions

- sethome: Sets the current location as home.
Restrictions
The Allow and Deny commands enable control over avatar restrictions, where Allow (=y) grants permissions, and Deny (=n) restricts actions. For example, the command /33 ger deny sendim sends @sendim=n to block Gerka from sending IMs. Any command in the RLV API that expects either =y or =n is compatible with this system.
Additionally, there is a CustomRestrictions notecard inside the object, allowing you to group multiple restrictions under a single name. This feature makes it possible to apply or remove several restrictions at once. For instance, the command /33 ger deny inventory applies restrictions for showinv, viewnote, viewscript, viewtexture, and share all at once.
Restrictions and folder locks use LinksetData (LSD) and will survive a script-reset.
-deny <action>

-allow <action>
-status: Shows a list of avatar status and current restrictions.
-clear: Removes all active denied restrictions, restoring full permissions.
The proximity system enables command automation based on spatial conditions.
Example: ‘ /33 ger proximity remove cuffs’ removes the cuffs folder when the authorized avatar is within 10 meters range.
By default the above command is what to do when “close”. The “far” counterpart exists also.
Example:’ /33 ger proximity far unleash’
- proximity <range (optional)> <command name>

- proximity list: Shows the list of saved proximities.

- proximity clear <command name>: Removes a specific proximity.

- proximity clear: Clears all proximity commands.
Mouselook and Vision
The mouselook command forces the avatar from the standard third-person view into mouselook mode, locking the camera into a first-person perspective that follows the avatar’s head movement. While mouselook is active, the system ensures the camera remains in this mode, even if there are attempts to change the view. To exit mouselook mode, simply type mouselook off.
The camdistance command allows control over the maximum distance the camera can be positioned from the avatar, providing flexibility in setting a close-up or distant view. To remove this restriction, use camdistance clear.
The windlight command offers control over the avatar’s environmental lighting by applying a custom Windlight environment or resetting it to the default. When a Windlight environment is applied, it locks with @setenv=n, keeping the lighting fixed and preventing changes. To set a specific Windlight environment, use windlight:<uuid>, where <uuid> is the unique identifier for the desired preset. To revert to the default environment, use windlight clear.
     - mouselook on: Forces mouselook view.

     - mouselook off: Disables mouselook view.


     - camdistance <distance>: Sets a maximum zoom distance.

     - camdistance off: Removes zoom restriction.


     - windlight <UUID> or <*Name>: Sets and locks the windlight preset.

     - windlight clear: Unlocks and sets the windlight to default.


*Name for windlight is possible if it exists in the avatars inventory
Relay
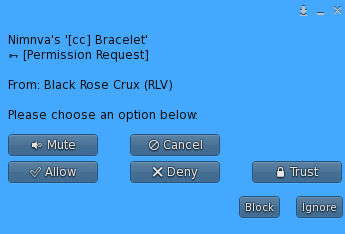
The relay is a communication tool that serves as a middleman between the avatar and external objects that want to apply restrictions on the avatar, it filters and manages incoming commands from objects and ensures they are authorized. The relay asks for permission when a new restriction command is received.
A dialog box is presented to the user with options like Allow, Deny, Trust (allowing future commands without prompting), Mute (ignore this sender’s commands).
If an Authorized Avatar is set, they will be prompted with the dialogue instead.
- relay auto: Sets the relay to auto.

- relay normal: Sets the relay to normal.

- relay off: Sets the relay to off.

- relay reset: Resets the relay clearing trusted and muted objects and setting it to normal.
Playing Animations
The animation system allows the user to start or stop playing animations that are stored in the object’s inventory. By specifying the animation name in quotes, users can play animations instantly. The system searches for the named animation in the object’s inventory, and if it exists, it plays the animation for the avatar. Using an empty set of quotes after the prefix immediately stops the active animation.
To play an animation, type the name in quotes.

- Example: /33 ger "dance" will start the dance animation if it exists in the object inventory.

To stop an animation, use an empty name in quotes.

- Example:  /33 ger "" stops the animation.
"kneel":  kneel with hands front.

"kneel2":  kneel with hands front in middle.

"kneel3": kneel with hands behind back.

"table": assumes a table position.

"back":  lie on back.

"front": lie on front.

"cutie": cute sitting position.

"sleep": sleeping position.